Photograms
What is a photogram?
A photogram is what is produced by placing any objects on top of paper that is light sensitive, then shining a light onto the paper and objects.
The print of the objects then reflects onto the light sensitive paper; whilst the paper that is in direct contact with the light becomes overexposed, shortly after this you place your photogram into light sensitive chemicals which are in the red room, these chemicals are:
-Developer,
you leave your photogram in this chemical for one minute and this allows the paper that has been exposed to light to develop and darken.
-Stop,
you also leave your photogram in here for one minute, this furthermore gets rid of any grey or arid areas in your photo, and will stop your picture by becoming overexposed.
-Fixer,
your photogram will need to be kept in this chemical for a total of three minutes, this is because it almost 'holds' the photogram together.
-Bathing,
after your photogram has gone through these chemical steps, you will rinse it and wash it in cold or room temperature water, this just 'polishes' your picture and gets rid of the left over chemicals , after this is ready your picture is ready to go through the drier. At the end of this process you will have a photographic image produced without a camera.
The darkroom.
The dark room is where the magic happens, it is essentially a room that is made up of chemical, light, light sensitive paper and most importantly safe light. The safe light is very important because this allows us to take out the light sensitive paper without it becoming overexposed. The top rules about the dark room itself are to always keep the light sensitive paper draw shut, don't mix the chemicals or the equipment that is being used per a chemical.
The dark room is where the magic happens, it is essentially a room that is made up of chemical, light, light sensitive paper and most importantly safe light. The safe light is very important because this allows us to take out the light sensitive paper without it becoming overexposed. The top rules about the dark room itself are to always keep the light sensitive paper draw shut, don't mix the chemicals or the equipment that is being used per a chemical.
Exposure test/Test strip and print.
An exposure tests is when we already have a made photogram, and we place it on top of the light sensitive paper facing the shiny side. We then place a piece of glass on top of these two sheets, the reason for the glass is that it prevents the paper from curving or flapping upwards, which furthermore would mean that light would go underneath and over expose the new photogram making it an unfair exposure test. On top of the glass we would place a piece of card covering three quarters of the photogram, let the light chin for one second, then we would move the card slightly so its covering two quarters of the photogram and once again allow the light to shine for one second, then we repeat this process two more times by moving the card down by covering 1 quarter and then allowing the light to shine on the full photogram without any card covering. The point of this exposure test is to see the correct amount of time we need to expose the light onto our photogram for when we are doing a sandwich print, this allows the picture to not be overexposed.
An exposure tests is when we already have a made photogram, and we place it on top of the light sensitive paper facing the shiny side. We then place a piece of glass on top of these two sheets, the reason for the glass is that it prevents the paper from curving or flapping upwards, which furthermore would mean that light would go underneath and over expose the new photogram making it an unfair exposure test. On top of the glass we would place a piece of card covering three quarters of the photogram, let the light chin for one second, then we would move the card slightly so its covering two quarters of the photogram and once again allow the light to shine for one second, then we repeat this process two more times by moving the card down by covering 1 quarter and then allowing the light to shine on the full photogram without any card covering. The point of this exposure test is to see the correct amount of time we need to expose the light onto our photogram for when we are doing a sandwich print, this allows the picture to not be overexposed.
Sandwich print/Negative to positive.
A sandwich print is when we already have a current photogram that we want to invert. By doing so we will have how the picture would look normally. We take our photogram and place it on top of the light sensitive paper, making sure the photogram is facing the sticky side, we then place a large piece of glass on top of both the photogram and the light sensitive paper, this prevents any folding of curling of the original photogram, if we were to not use the glass and the photogram was curling, the new paper would be exposed to light making it overexposed. We then expose the sandwich print to light for around three to five seconds, then it goes through the chemicals and you have produced a sandwich print.
A sandwich print is when we already have a current photogram that we want to invert. By doing so we will have how the picture would look normally. We take our photogram and place it on top of the light sensitive paper, making sure the photogram is facing the sticky side, we then place a large piece of glass on top of both the photogram and the light sensitive paper, this prevents any folding of curling of the original photogram, if we were to not use the glass and the photogram was curling, the new paper would be exposed to light making it overexposed. We then expose the sandwich print to light for around three to five seconds, then it goes through the chemicals and you have produced a sandwich print.

Solarising.
Solarising is when you do the normal steps of a photogram, by having the light sensitive paper and placing objects on top ,and then exposing it to the light for around three seconds. You then place it through the first chemical which is the developer, then after the photo has been exposed and is visible, you take it out of the developer and re expose it for around half the time you did in the first place, shortly after continue developing your picture in the chemicals as usual. Your print should come out like a normal photogram but instead with grey shadows and almost a slowly look on the objects, and there you have a solarised photogram.
Solarising is when you do the normal steps of a photogram, by having the light sensitive paper and placing objects on top ,and then exposing it to the light for around three seconds. You then place it through the first chemical which is the developer, then after the photo has been exposed and is visible, you take it out of the developer and re expose it for around half the time you did in the first place, shortly after continue developing your picture in the chemicals as usual. Your print should come out like a normal photogram but instead with grey shadows and almost a slowly look on the objects, and there you have a solarised photogram.

Weaving.
Weaving is the result of a photogram and then a sandwich print of that same photogram and then weaving them together. In order to weave these two prints together you need to cut one of them vertically, and cut the other horizontally. Shortly after you decide which one you want to use to weave and you thread it over and under and so on. Weaving is a very simple procedure that allows us to make photograms way more interesting than they actually are.
Weaving is the result of a photogram and then a sandwich print of that same photogram and then weaving them together. In order to weave these two prints together you need to cut one of them vertically, and cut the other horizontally. Shortly after you decide which one you want to use to weave and you thread it over and under and so on. Weaving is a very simple procedure that allows us to make photograms way more interesting than they actually are.

Pin hole photographs.
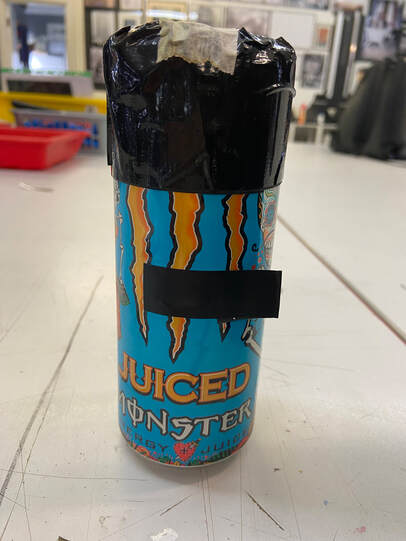
Pin hole photographs is us essentially creating a camera and allowing light to reflect onto the light sensitive paper to re enforce an image that we are capturing. The first step on the pin hole photograph is to actually create the so called 'camera'. Firstly you want to start off with a can, a beer can or energy drink can is ideal. Pour out the drink, or enjoy it yourself, and rinse the can. You're going to use a can opener to slit off the top of the can leaving you visual and physical access to the inside of the can. This will reveal if there is any liquid left inside, if so rinse that out. You will then need to sand down the top of the can so you don't injure yourself since it is a very sharp edge. After doing so you are going to create the 'lid' for the can. For this you will need to get some black card, wrap the card around the beer can, and fold it over, securing this with masking tape. Then you will place the circle of card on top of the 'lid' and tape this on with gaffer tape. This will prevent any light coming through in order to protect your light sensitive paper. Lastly now you have your camera, you need a hole for the light. You will taker a pin and directly place it in the middle of the can, after doing so, apply pressure down slightly, this should create a tiny pin hole. Take some electrical tape and place it over the hole to prevent light coming through all the time, you only want the light to come through when it is necessary, if this is the case you will remove the electrical tape and place it back on top after you are finished with your exposure time.
Pin hole photographs is us essentially creating a camera and allowing light to reflect onto the light sensitive paper to re enforce an image that we are capturing. The first step on the pin hole photograph is to actually create the so called 'camera'. Firstly you want to start off with a can, a beer can or energy drink can is ideal. Pour out the drink, or enjoy it yourself, and rinse the can. You're going to use a can opener to slit off the top of the can leaving you visual and physical access to the inside of the can. This will reveal if there is any liquid left inside, if so rinse that out. You will then need to sand down the top of the can so you don't injure yourself since it is a very sharp edge. After doing so you are going to create the 'lid' for the can. For this you will need to get some black card, wrap the card around the beer can, and fold it over, securing this with masking tape. Then you will place the circle of card on top of the 'lid' and tape this on with gaffer tape. This will prevent any light coming through in order to protect your light sensitive paper. Lastly now you have your camera, you need a hole for the light. You will taker a pin and directly place it in the middle of the can, after doing so, apply pressure down slightly, this should create a tiny pin hole. Take some electrical tape and place it over the hole to prevent light coming through all the time, you only want the light to come through when it is necessary, if this is the case you will remove the electrical tape and place it back on top after you are finished with your exposure time.
|

|
Ben Nathan
Ben Nathan is the artist who provides the inspiration for the pin hole camera section of this course. He does a lot of different forms of art such as painting and photography to film and sculpture which is very diverse. His main priority and target for his whole pin hole photography was to photograph areas and the urban feel, he did this to make sure that the communities that were seen as having a downfall were represented properly.


My response
For my response to Ben Nathan I used the pin hole camera I made. Firstly you are going to take a piece of light sensitive paper and place it inside of the camera, make sure you are doing this inside of the dark room or the paper will become overexposed and you will need to start again. Once you have done that you are going to place the lid of the pin hole camera back on. Where you actually punctured a hole onto the pin hole camera will be covered with a piece of duck tape which will easily be removed after I have taken the picture. Once I've chosen how and where I want to take my picture I went ahead and completed an exposure test to see what the correct amount of time due to the lighting would be perfect for my photo. For example for my portrait, I got my peer to stand still while I put the camera on a flat surface and opened the tape over the pinhole for 4 seconds. Once the image has been taken the paper should not be exposed to light again as it is light sensitive and so will darken when exposed. The chemical processing inside of the darkroom is the same as it is for developing photograms; developer (2mins), stop (1 min), fix (5 mins), water bath (5 mins).

Portrait
I shot this image from a table and got my peer to stand on the on the floor in order to be in the frame. I exposed this image for 5 seconds as the sun wasn't quite as bright when shooting. My positive print has more detail visible such as the brick outlines on the building behind my peer, however my negative print looks more defiant and has a greater contrast although it is reversed.
|
POSITIVE

|
NEGATIVE

|
Building
Similar to my portrait, I shot this image from a table, took off the electrical tape and exposed it for 7 seconds because the sun was barely out whilst shooting. The outline of the building is very clear in both the positive and negative versions; however, the bottom left corner is quite dark so maybe if I was to reshoot, I would slightly lower the exposure time to 3.5 seconds.
|
POSITIVE
|
NEGATIVE
|
Window view
I shot this image from the top floor of a building, with a view overlooking trees and my school, also I exposed the light sensitive paper for 4 seconds. It is evident I didn't keep the can completely still while exposing because the image is a bit blurry, and if I were to shoot again, I would make sure I kept it still. I like the composition of the window which frames the view, and the contrast between the drama and they sky creates a moody tone. The focal point of the image is the view of the sky, trees and buildings, and I think my composition compliments it and allows us to see that there is more than what we perceive to the eye.
|
POSITIVE
|
NEGATIVE
|
